Linux
I need a new mp3-player: why not buy again a (used) Sansa Clip+ and Rockbox it?
Guide is still valid.
Downloading the firmware-binary and running the Rockbox-installer (now at version 3.14) under Linux was not a problem.
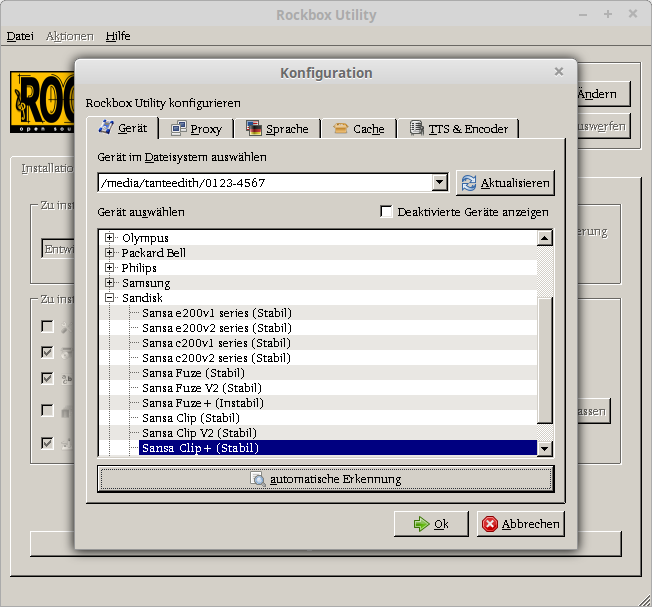
Five minutes later I got a “new” working player. Still prefer it to the (smart-)phone while doing fitness.
proper rename-scheme for digiKam
The Olympus-cam has no nice way to set an immediate scheme for the filename, so I transfer the files to the PC and fire up digiKam:
|
1 |
[date:yyyyMMdd-hhmmss]{unique:3} |
Fun fact: since it is based on KDE –> Qt, it also uses the same formatting for DateTime like Qt. Horay 🙂
Addendum: to fix the annoying “no klauncher found”-message and the invisible thumbnails after some certain apt-get-upgrades, just run
|
1 |
sudo apt-fast install kde-runtime |
again.
Need to fake some incoming packets?
Try Packet Sender (available for all major OS: I used the portable version for Windows as well as the AppImage for Linux (I love that AppImage-idea. Already the third OSS which was packaged like this instead of a *.deb or as pure source ..)) to emulate the sending of some UDP-datagrams to test one of my programs. And it works really neatly.
You’ve got a tidy window with some textfields for receiver, type and content, a “fire away”-button, some repeat-ability. Nice!
On the receiving end we all know Wireshark. But the emulation was (at least to me) before some big black hole.
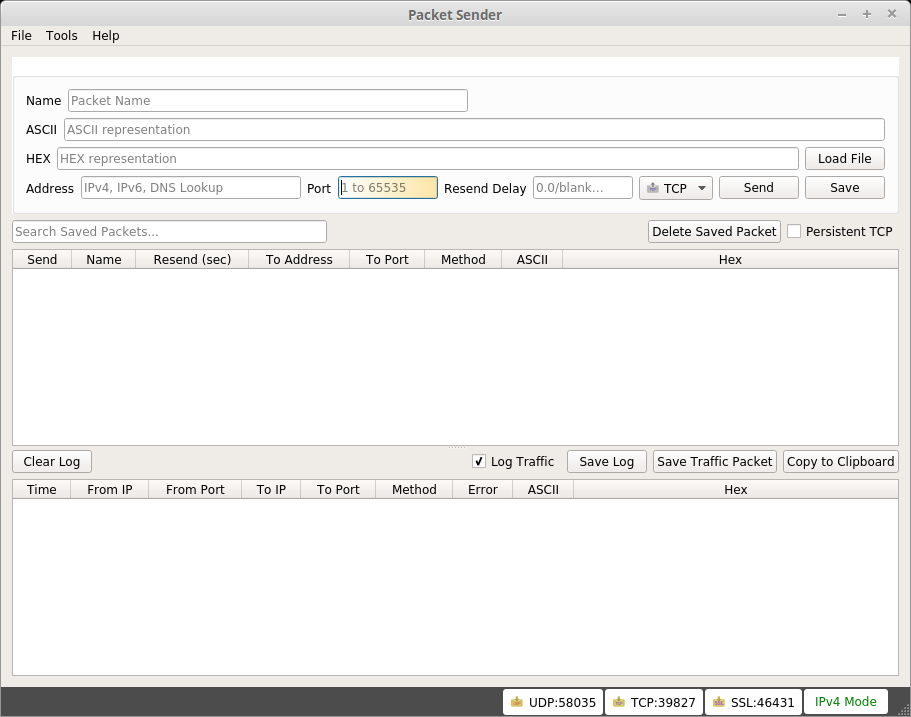
Yes, I know, there would be as well sendip. But at work I barely could make a Cygwin work. Not to speak about some dynamic “oh, I load more packages on the fly from the internet”-possibility, meh.
But for those interested: short tutorial for sendip.
proCreator version 0.1 is ready!
url: https://github.com/marcelpetrick/proCreator
Clone, build (preferrably with QtCreator 4.x and Qt 5.9), run. A short howto in the readme describes how to use it.
After applying some restructuring, I got rid of some classes, simplified the code for reading the directory-content and for filtering. Kudos to the Qt-library!*
* Three slogans I like to stick to:
– Keep it simple (and stupid).
– Don’t re-invent the wheel.
– Functionality first.
Addendum: the proCreator was used now to revive two projects for which only source-code, but no “make-files” (pro, qbs, mpc, cmake ..) existed. It did its job 🙂
proCreator: another helper for legacy Qt-projects
Ok, today at work I ran into the problem that for a Qt-project we have the code, the binaries and an awkward buildsystem (mpc). But I don’t want to process first the mpc and then fire up Visual Studio and wait for hours until the whole solution has been build. I want to use QtCreator! <3 So, there was never a real pro-file. The project consists of about ten classes, some forms and one ressource-file. Not much, possible to tinker it manually into a self-generated pro-file. Which can be processed then by QtCreator or qmake. (Hint "ls -X" is helpful for sorting by filetype.) But: why not delegate this to a small tool? First I thought about bash, then ... "maybe something better, like Python" ... and then ... why not Qt itself? So, please have a look at https://github.com/marcelpetrick/proCreator, which is half-way done. Outputting works. Just input-grabbing has to be implemented. Should be ready by sunday 🙂
Will keep you updated.
Enforce HDMI with 1920×1080 on Raspberry Pi 3 and Raspbian
Ok, we have a brand new RPi, an SD-card with the latest Raspbian, some brand new monitor with HDMI-input only.
Everything is set up, the power plugged in, one LED shines, another one, then “no signal” on the monitor.
0. SSH-access not possible due to the fact that because of those botnet-takeovers of RPi in the past the default access was disabled for fresh images.
1. Wifi with VNC also impossible, because how to set the Wifi-credentials if you can’t see something?
2. VGA not possible due to hardware-limitations.
Great 🙂 I love when soft-/hardware does not work out of the box :’)
After a while of tinkering I remembered that I had to enforce the HDMI-ouput on the first RPi (the one for the catcam).
Can be set inside /boot/config.txt (leafpad is the current default editor on Raspbian).
|
1 2 3 4 5 6 7 8 9 10 11 12 13 14 15 16 17 18 19 20 21 22 23 24 25 26 27 28 29 30 31 32 33 34 35 36 37 38 39 40 41 42 43 44 45 46 47 48 49 50 51 52 53 54 55 56 57 58 59 60 61 62 |
# For more options and information see # http://rpf.io/configtxt # Some settings may impact device functionality. See link above for details # uncomment if you get no picture on HDMI for a default "safe" mode #hdmi_safe=1 # uncomment this if your display has a black border of unused pixels visible # and your display can output without overscan disable_overscan=1 # uncomment the following to adjust overscan. Use positive numbers if console # goes off screen, and negative if there is too much border #overscan_left=16 #overscan_right=16 #overscan_top=16 #overscan_bottom=16 # uncomment to force a console size. By default it will be display's size minus # overscan. #framebuffer_width=1280 #framebuffer_height=720 framebuffer_width=1920 framebuffer_height=1080 # uncomment if hdmi display is not detected and composite is being output hdmi_force_hotplug=1 # uncomment to force a specific HDMI mode (this will force VGA) hdmi_group=2 hdmi_mode=82 # uncomment to force a HDMI mode rather than DVI. This can make audio work in # DMT (computer monitor) modes #hdmi_drive=2 # uncomment to increase signal to HDMI, if you have interference, blanking, or # no display #config_hdmi_boost=4 # uncomment for composite PAL #sdtv_mode=2 #uncomment to overclock the arm. 700 MHz is the default. #arm_freq=800 # Uncomment some or all of these to enable the optional hardware interfaces #dtparam=i2c_arm=on #dtparam=i2s=on #dtparam=spi=on # Uncomment this to enable the lirc-rpi module #dtoverlay=lirc-rpi # Additional overlays and parameters are documented /boot/overlays/README # Enable audio (loads snd_bcm2835) dtparam=audio=on # additional shit by me start_x=0 gpu_mem=128 |
Prepare an SD-card for Raspberry Pi (3)
Download latest Raspbian-image:
* https://downloads.raspberrypi.org/raspbian_latest
Install etcher:
* add “deb https://dl.bintray.com/resin-io/debian stable etcher” to /etc/apt/sources.list
* “sudo apt-key adv –keyserver hkp://pgp.mit.edu:80 –recv-keys 379CE192D401AB61”
* “sudo apt update && sudo apt install etcher-electron”
Use etcher .. (I think this step is self-explanatory).
20190807: etcher for Win (10): https://github.com/balena-io/etcher/releases/ – also as portable version
create win7-usb-drive under Linux
Ok, first I squashed the only computer with a cd-burner. Installed Linux Mint 18.1. Everything perfect, went on to install VirtualBox and then Win7 as guest. Ran some checks while waiting. Noticed that in 2016 NO VIRTUALISATION solution SUPPORTS IEEE1394!
Ok, then just install Win7 again. Noticed I can’t find my burned install-DVD, had just an ISO.
# format usb-drive as NTFS
# download Unetbootbin as special version: allows to select NTFS- and other partitions
# select ISO, hook “show partitions”, select /dev/sdb or whatever it is
# plug out, plug in, start, select boot device, install … wait over 9000! hours.
share a folder via SMB on CLI
The missing counter-part for this post.
- create new smb-user pi: “
$ sudo smbpasswd -a pi“ - create directory: “
$ mkdir freigabeATminipc“ - set rights: “
$ sudo chmod 770 freigabeATminipc/“ - edit config: “
$ sudo nano /etc/samba/smb.conf”
add at end of the file the following and save-quit (CTRL+X; y)
|
1 2 3 4 5 6 7 |
[freigabeATminipc] comment = for sharing path = /home/pi/Desktop/freigabeATminipc valid users = pi browseable = yes read only = no guest ok = yes |
- restart: “
$ sudo service smbd restart“ - check if everything fits: “
$ testparm“
RPi: force certain resolution for VNC in headless mode
Edit /boot/config.txt (maybe via “$ sudo nano /boot/config.txt”) and add the following two lines:
|
1 2 |
framebuffer_width = 1024 framebuffer_height = 768 |
Other sources suggest also to tinker with the hdmi_mode, but for my Raspberry Pi 3 this was sufficient.
Full official manual for config.txt.