OSX
macOS: THE operating system for ~the unproductive~ artists
It’s quite funny. 2012 I’ve used the first time macOS (or how it was called OSX) in version 10.6.8. Now Apple has reached 10.15 and there is still no proper, simple, menu-guided way to enable an file-explorer for productive use.
How to show the current path in the title of the finder:
(bash and then enter those two lines for configuration and restarting the Finder)
|
1 2 |
defaults write com.apple.finder _FXShowPosixPathInTitle -bool true killall Finder |
How to go to a known path:
Ctrl+Shift+G -> then enter the path.
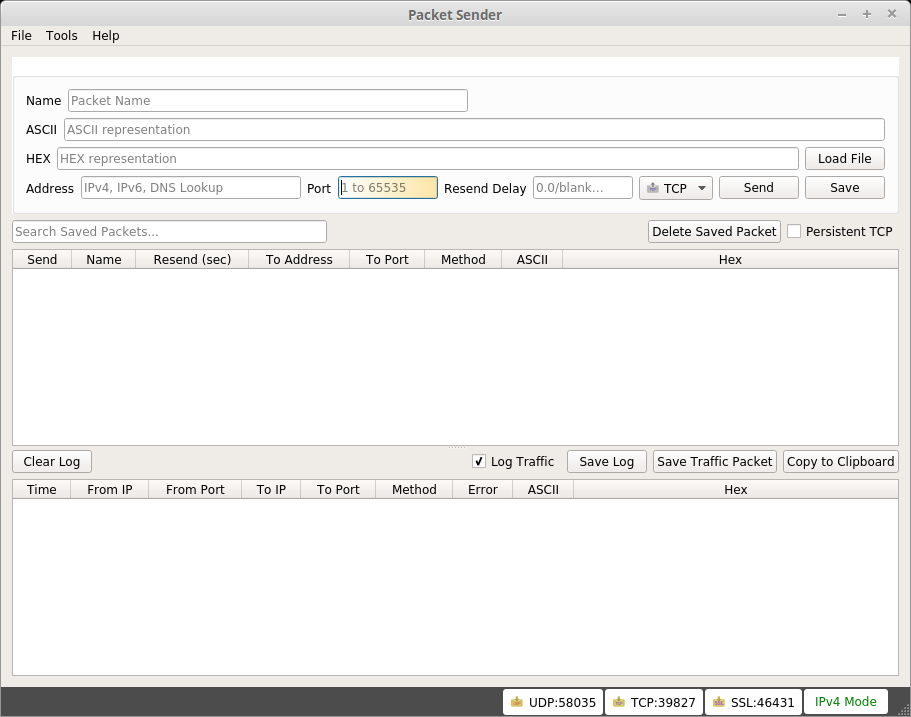
Need to fake some incoming packets?
Try Packet Sender (available for all major OS: I used the portable version for Windows as well as the AppImage for Linux (I love that AppImage-idea. Already the third OSS which was packaged like this instead of a *.deb or as pure source ..)) to emulate the sending of some UDP-datagrams to test one of my programs. And it works really neatly.
You’ve got a tidy window with some textfields for receiver, type and content, a “fire away”-button, some repeat-ability. Nice!
On the receiving end we all know Wireshark. But the emulation was (at least to me) before some big black hole.
Yes, I know, there would be as well sendip. But at work I barely could make a Cygwin work. Not to speak about some dynamic “oh, I load more packages on the fly from the internet”-possibility, meh.
But for those interested: short tutorial for sendip.
What to do with spare 2 TB-drives?
Let’s prevent that this blog turns into pure rants and finalize some articles which were (almost) finished for weeks.
I had a spare 2 TiByte 3.5″-SATA-drive from the NAS (replaced with 4 TiByte each), but did not want to use it in my PC. Why? An SSD with 128 GiByte is enough. I don’t want to replicate the archive.org ..
So I decided to make an Apple-fanboi happy: external drive for TimeMachine (tm!) XD
Synergy
I was using this tool already in 2005(!) and recently re-discovered it when I set up again a multi-monitor multi-system desktop at home. Synergy allows to share keyboard and mouse between different systems by defining virtual expansions at the edges of the ‘server’. Layout is configurable. It is even possible to share the input between different operating systems!
Use the nightly build-download-archive, because for the stable release they charge at least 10$ (since 2014 ).
- install at both systems
- define one as server
- enter the server-IP at the client
- configure a expansion-setup for the screens, done!
edit 20190319: url for the repo not working anymore, use https://sourceforge.net/projects/synergy-stable-builds/ (v1.8.8) instead. Worked on OSX <--> Win10.
Install an operating system-rage
I hesitated for a longer time to add rant-posts to this blog. Reason is: most of the time not the criticized fact is noted by the reader but the fact that someone complains.
From time to time you encounter some flaws or bugs or “design-choices” whre you start to think: this can’t be an accident. Or there are reasons I don’t understand. But this is nothing which could not be fixed.
Therefore todays rant: create/recover a working and sound operating system. I just refer to the major three ones: Windows, OSX and GNU/Linux.
- OSX: Boot, press CMD+R, select recover and add you favorite Wifi and wait: no problem. But since its a really enclosed environment in terms of hard- and software I did not expect something cumbersome/special. Since it is not wanted that you can change something inbetween, the needed user-interaction is quite limited. Works, ok.
- Linux: I always have a USB-stick with one of the latest Linux Minut (former times Ubuntu, DSL, Kubuntu or just some other distro) in my pocket. Reasons: I don’t trust foreign computers for sensible data (plug it in and use a live-system) AND safety (main system fails to boot? Oh, you still have some backup solution :D). So this is inserted, then select for booting this stick either via UEFI or BIOS. Boot, select in GRUB the real version, “Install Linux”, maybe addd Wifi/ethernet before, add additional user-data, maybe change partition so that your old home-partition is mounted correctly, reboot, unplug the stick, run maybe “sudo apt-get update && sudo apt-get upgrade” ONCE and be happy. Although this text is quite big this takes roundabout 60 to 90 minutes! Et voila: working system with all your previous data. Almost all devices have correct drivers and are usable. Continue with your work …
- Windows: buy a Win7 Ultimate-key (2 min), burn a 3 GiByte-image for the corresponding version on DVD, insert and reboot. Select to install, add all the needed credentials. 1 hour later it looks like you can reboot. Oh, 800×600 display resolution, no fucking device is recognized, therefore neither ethernet nor Wifi are usable to get additional drivers and updates, I can use the mouse and that is all. No usable tools for image viewing and editing, nothing. A bare system. Is this a joke? Microsoft, come on … when this happended to me in former times for older versions of Windows I thought this is how it should be. But why don’t you force the manufacturers to create small driver-libraries for their stuff so that at least basic, minimal support for all the hardware is given? Why is this possible for FOSS-projects but not for you with your big market-reach?!?
Back to topic: so I downloaded and installed the basic drivers and then armaggeddon happend: 179 important and 49 optional updates are offered. OK? why not, better safe than sorry. ONE fucking DAY later the whole cycle of installing, rebooting and re-doing the search for newer updates was still not finished. And I started with SP1, not the original Win 7-release. This is 2015, hello!
Ok, to cut it short: having to install Windows is still the worst what can happen. Sometimes it is needed, because some Wine and virtual machines are not covering everything.
cppcheck pt. II
It’s quite funny if you want to use the current version of your favorite static code analysis-tool, then realize that no OS-binary is availabe, then think “why not create it yourself like you did it with older versions?” (qmake && make ..), then realize your current clang-version does not support the missing c++11-features (cbegin/cend), then you realize you are not allowed upgrade your local compiler ..
To put it in a nutshell:
|
1 |
homebrew install cppcheck && cd <source to check> && cppcheck --enable=all --inconclusive --std=posix . 2> cppcheck.txt |
Yes, this leaves you without the gui, but still better than nothing.
side note: I also found the cppcheck-plugin for QtCreator-project on sourceforge (new since august 2015?), but since the contributor provides just Win and Linux binaries, but neither source nor OSX-binaries, I have to wait. But looks promising.
edit 20151005:
Only fifteen hours after my request the russian mastermind behind the project built an OSX-dylib for the cppcheck-plugin and offered it to me for testing. After update from QtCreator 3.42 to 3.5, copying the plugin, activating it and setting the path to the homebrew-1.70-cppcheck, everything works! No more switching between the cppcheck-output and QtCreator, just fix the issues! *feels good*
edit 20151006:
Now it is officially available. Enjoy!
At least once I had the appropriate tools at hand ..
tl;dr: How to retrieve ext4-data from the broken laptop’s drive with a Mac mini (OSX 10.9)
* download and install FUSE for OSX
* download and install fuse-ext2
* reboot
* mount the specific partitions via diskutil & copy the wanted data & wait ..
Read more…
No one said this will be easy: GT-i9506 with CM12 & no bloatware
I just wanted to replace the OEM-Samsung Lollipop with the latest CyanogenMod-version on my Samsung Galaxy S4 LTE (GT-i9506).
So the simple plan was to: root the device; replace the ROM with CM12; add the Gapps-package; reboot and be happy ..
.. in the end I tried so many different ways involving Linux Mint, OSX 10.9 and Windows 7 as host-system; flashing via adb, heimdall and Odin; different nightlies and kernels; several gapps-packages and seven hours lifetime .. but I learned a lot 😀
tl;dr:
- Win7: install Samsung driver; reboot, reboot, reboot
- root with CF-AutoRoot: guide // download – use “root checker” or some other app to verify the superuser-access before rebooting into download mode
- flash TWRP via Odin
- flash CM12-nightly: download
flash gapps: downloadflash minimal GApps: download (is without the useless crap)- wipe cache/dalvik
- reboot and setup everything from scratch (or with some backups … you created some, didn’t you? 😀 I used “Easy Backup & Restore” – worked perfectly. K-9 Mail can restore itself ..)
edit: 20150724 replaced Gapps with “GAPPS minimal”; restored all settings, SMS, contacts, …
TimeMachine: backup couldn’t be completed … fix this
Ok, TimeMachine runs from time to time, backups pile up and the disk is filled. So what now? Format it? No! Drop the oldest backup!
Initi
|
1 2 3 4 |
echo "first list all existing backups" tmutil listbackups echo "pick the one with the oldest date and delete it; put the name in double quotes" sudo tmutil delete "/Volumes/driveName/Backups.backupdb/Marcels iMac/2015-05-19-110051" |
Initial inspiration for the solution was derived from this thread at stackexchange.
Create an usable linux-usb-drive with OSX
Based on this tutorial (for Linux itself, use Unetbootin).
Open a terminal and then run:
|
1 2 3 4 5 6 7 8 9 10 |
echo "convert the iso" hdiutil convert -format UDRW -o linuxmint-17.2-cinnamon-64bit-rc.iso.img linuxmint-17.2-cinnamon-64bit-rc.iso echo "show all drives" diskutil list echo "make sure the drive-to-use is not mounted" diskutil unmountDisk /dev/disk4 echo "copy image to drive" sudo dd if=linuxmint-17.2-cinnamon-64bit-rc.iso.img.dmg of=/dev/rdisk4 bs=1m echo "safely eject the drive" diskutil eject /dev/disk4 |
Used it twice to create first a Kubuntu-stick (did not like the desktop-enviroment) and then a newer for Linux Mint (latest version).

